In this example, we are going to implement a Weather Widget as an excuse to learn how to use the most commonly used features of WireCloud from a point of view of Widgets. Our intention is to create a Widget capable of making AJAX request to a external service and of communicating with other widgets in a mashup. This guide does not cover the development of the widget's user interface, which doesn't have to do with WireCloud and it's based on standard HTML, JavaScript and CSS code.
First of all, download this initial code from this link. This code contains a widget example skeleton including basic html/style code.
Also, you will need to create a new API key for the Weather Underground API using this link.
Weather Underground provide a rest API for this purpose (documented at
http://www.wunderground.com/weather/api/d/docs), but
we cannot access this API using normal AJAX request (using XMLHttpRequest
) due
browsers applying the same origin policy to javascript
code. Fortunately, WireCloud provides the
MashupPlatform.http.makeRequest method for dealing with this
problem.
A possible way to access to this API is by using the following code:
var getForecastByCoord = function getForecastByCoord(coord, onSuccess, onError) {
var url;
if ((typeof onSuccess !== 'function') || (typeof onError !== 'function')) {
throw new TypeError();
}
url = 'http://api.wunderground.com/api/' + API_KEY + '/conditions/forecast/q/';
url += coord.lat + ',' + coord.lon;
url += '.json';
MashupPlatform.http.makeRequest(url, {
method: 'GET',
onSuccess: function (response) {
var forecast_data;
forecast_data = JSON.parse(response.responseText);
if (forecast_data.error) {
onError();
} else {
onSuccess(forecast_data);
}
},
onError: function () {
onError();
}
});
};
The getForecastByCoord
function makes the appropriated request to Weather
Underground and passes the result to the onSuccess
callback.
Input endpoints must be declared into the widget template before it can be used
by the javascript code of the widget. To do so, open config.xml
and add an
inputendpoint
element into the wiring
section. The final result should look
like:
...
<wiring>
<inputendpoint
name="coord"
type="text"
label="Show forecast by coord"
description="Shows the weather forecast for a given location (a latitude longitude coordinate)."
friendcode="location"
/>
</wiring>
...
name
attribute will be use to reference to the input endpoint when
using the javascript APItype
attribute defines the type of data this input endpoint will accept,
currently only "text" (string) is supported.label
attribute will be used mainly in the Wiring Editor and will be
the official name by which end users will know the input endpoint. Also, this
attribute can be translated whereas the name attribute not.description
attribute is used to provide end user with a description
of what is going to happen if an event arrives the input endpoint. This
description is very important for the wiring process as the user needs this
information for taking decisions on how to wire widgets and operatorsfriendcode
is used by the Wiring Editor to provide basic wiring
recommendations. In this case, we are declaring that we accept data produced
by output endpoints with a friendcode of "location". The format of this data
is a string with the longitude and the latitude separated by a commaThis is how to declare the input endpoint when using RDF (turtle):
...
wire:hasPlatformWiring [ a <http://WireCloud.conwet.fi.upm.es/ns/widget#PlatformWiring>;
wire:hasInputEndpoint [ a <http://wirecloud.conwet.fi.upm.es/ns/widget#InputEndpoint>;
rdfs:label "Show forecast by coord";
dcterms:description "Shows the weather forecast for a given location (a latitude longitude coordinate).";
dcterms:title "coord";
wire:friendcode "location";
wire:type "text" ] ];
...
Once declared the input endpoint in the widget template, you can register a
callback for this endpoint making use of the
MashupPlatform.wiring.registerCallback
method. In
addition to registering the input endpoint, we need to process event data before
using it and to notify the user that the forecast data for the given location is
being requested.
This can be accomplished by using the following code:
var searchByCoordListener = function searchByCoordListener(event_data) {
var tmp, coord;
tmp = event_data.split(',');
coord = {
lat: tmp[1],
lon: tmp[0]
};
startLoadingAnimation();
getForecastByCoord(coord, function (forecast_data) {
updateWeatherForecast(forecast_data);
stopLoadingAnimation();
}, function () {
clearWeatherForecast();
stopLoadingAnimation();
});
};
MashupPlatform.wiring.registerCallback("coord", searchByCoordListener);
As we did with the input endpoint, we need to declare the new output endpoint in the weather widget's description. This is the final result of the Wiring section after adding it:
...
<wiring>
<inputendpoint name="coord" type="text" label="Show forecast by coord" description="Shows the weather forecast for a given location (a latitude longitude coordinate)." friendcode="location"/>
<outputendpoint
name="location_coord"
type="text"
label="Forecast location"
description="This event is launched when the user clicks on the location name of current forecast."
friendcode="location"
/>
</wiring>
...
name
attribute will be use to reference to the output endpoint when
using the javascript APItype
attribute defines the type of data this output endpoint is going tolabel
attribute will be used mainly in the Wiring Editor and will be
the official name by which end users will know the output endpoint. Also, this
attribute can be translated whereas the name attribute notdescription
attribute is used to describe in which conditions the
resource (in this case a widget) is going to send events through this
endpoint. This description is also a good place for providing details about
the data structure used by events leaving this output endpoint. This
description is very important for the wiring process as the user needs this
information for taking decisions on how to wire widgets and operatorsfriendcode
is used by the Wiring Editor to provide basic wiring
recommendations. In this case, we are declaring that we send data aligned with
the friendcode "location"This is how to declare the output endpoint when using RDF (turtle):
...
wire:hasPlatformWiring [ a <http://wirecloud.conwet.fi.upm.es/ns/widget#PlatformWiring>;
wire:hasInputEndpoint [ a <http://wirecloud.conwet.fi.upm.es/ns/widget#InputEndpoint>;
rdfs:label "Show forecast by coord";
dcterms:description "Shows the weather forecast for a given location (a latitude longitude coordinate).";
dcterms:title "coord";
wire:friendcode "location";
wire:type "text" ] ];
wire:hasOutputEndpoint [ a <http://wirecloud.conwet.fi.upm.es/ns/widget#OutputEndpoint>;
rdfs:label "Forecast location";
dcterms:description "This event is launched when the user clicks on the location name of current forecast.";
dcterms:title "location_coord";
wire:friendcode "location";
wire:type "text" ];
...
After adding the output endpoint to the widget description, we can send data
through it using the MashupPlatform.wiring.pushEvent
method.
The following code adds an event listener to the location title that sends the
location of the current forecast:
document.getElementById('title').onclick = function (event) {
var long, lat;
long = forecast_data.current_observation.display_location.longitude;
lat = forecast_data.current_observation.display_location.latitude;
MashupPlatform.wiring.pushEvent('location_coord', long + ',' + lat);
};
Now that we have implemented the weather widget we can make use of it to test it is working as expected. One of the Widget that should be compatible with our newly created weather widget is the "Web Map Service" Widget so a way to test our widgets is to create a new Workspace with both widgets.
You can download Web Map Service widget from this link.
Here is a screenshot of a workspace with both widgets:
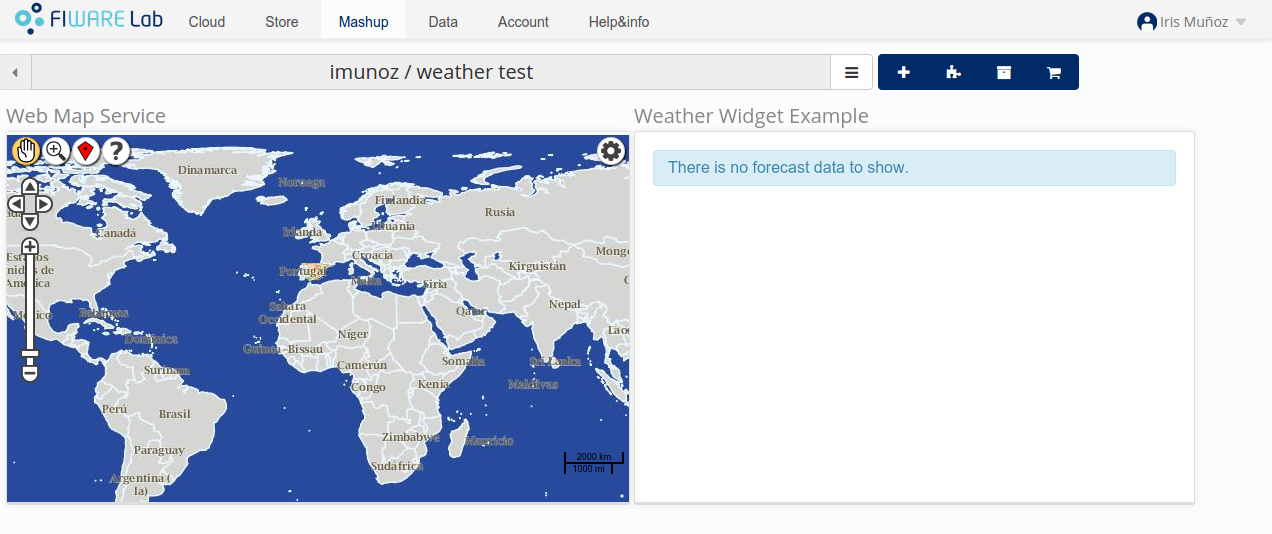
And how to wire them:
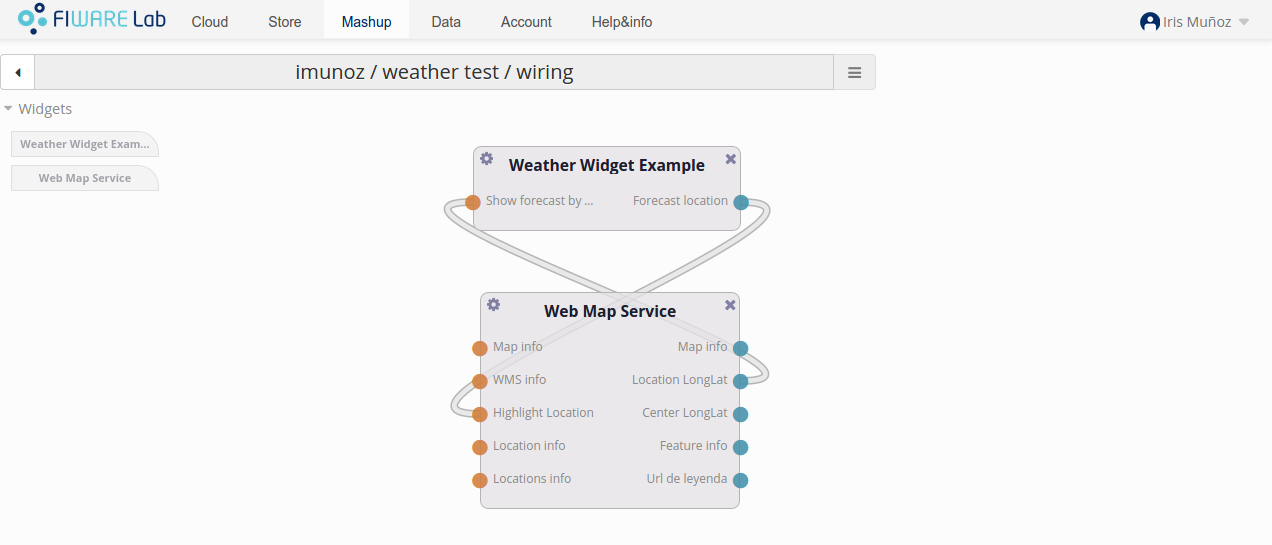
Go back to your dashboard and click in any place of the map. Your weather widget should be update and you should see something similiar to this:
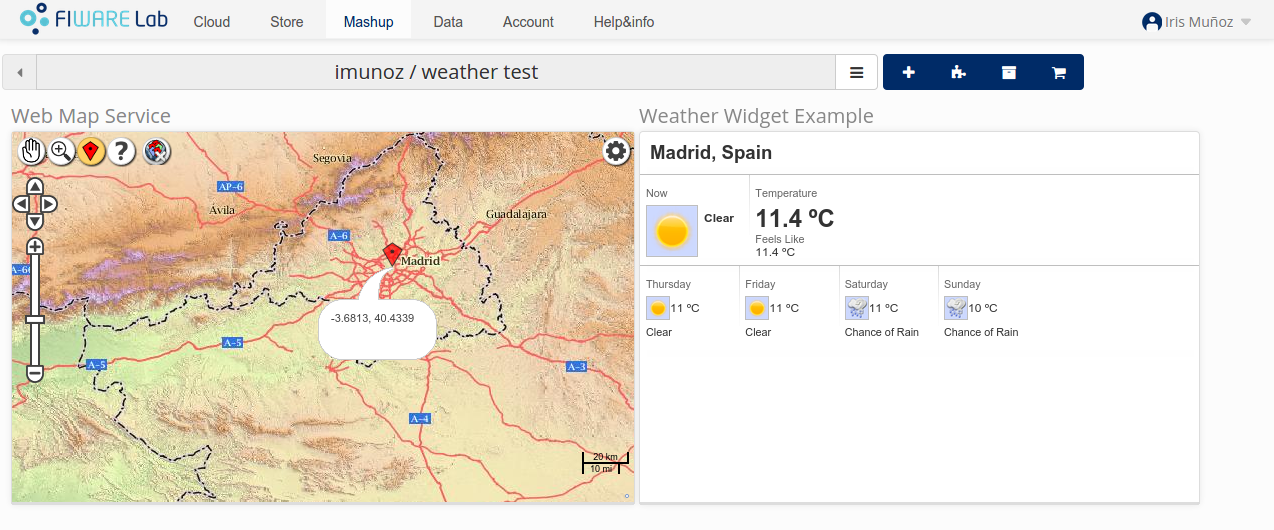
Also you should test that sending events from the widget is working correctly, so move the map viewport to another part of the world and click on the location title on the weather widget ("Horndon on the Hill, United kingdom" in the screenshot) so visit other places using the Web Map Service Widget and click on the location title to see if the Web Map Service goes back to the forecast location.
You can download both our implementation of the widget as the mashup example.
Table of Contents | t |
---|---|
Exposé | ESC |
Full screen slides | e |
Presenter View | p |
Source Files | s |
Slide Numbers | n |
Toggle screen blanking | b |
Show/hide slide context | c |
Notes | 2 |
Help | h |